Overview
Pulumi 는 클라우드 인프라를 생성, 배포, 관리할 수 있는 IaC 오픈소스 툴이며, Pulumi Cloud 와 결합하여 사용할 수 있습니다.
TypeScript, JavaScript, Python, Go, .NET, Java 및 YAML과 같은 마크업 언어 등 기존 프로그래밍 언어와 해당 기본 에코시스템을 활용하여 클라우드 리소스와 상호 작용합니다.
CLI , SDK, 런타임, 라이브러리 및 호스팅 서비스가 함께 작동하여 클라우드 인프라 프로비저닝, 업데이트 및 관리를 위한 강력한 플랫폼을 제공합니다.
그리고 여러 클라우드를 지원하고 있습니다.
Pulumi 구조
보다시피 스택 구조로 되어있으며, 새 인프라를 선언하려면
해당 속성이 원하는 인프라 상태에 해당하는 리소스 개체를 할당합니다.
이러한 속성은 필요한 종속성을 처리하기 위해 리소스 간에도 사용되며 필요한 경우 스택 외부로 내보낼 수 있습니다.
플루미 프로그램은 소스코드와 메타데이터가 있는 project 폴더에 있고 pulumi up 명령어를 하게 되면
스택이 생성됩니다.
Pulumi 설치
Linux OS
$ curl -fsSL https://get.pulumi.com | sh
$ pulumi version
v3.121.0
typescript 를 이용해 S3 버킷을 생성하기 위하여 먼저 nodejs를 설치해봅니다.
$ curl -o- https://raw.githubusercontent.com/nvm-sh/nvm/v0.39.7/install.sh | bash
$ nvm install 20
Now using node v20.15.0 (npm v10.7.0)
Creating default alias: default -> 20 (-> v20.15.0)
$ node -v
v20.15.0
$ npm -v
10.7.0
AWS credential 을 확인해 봅니다. ec2 iam role로 사용하며, 해당 역할은 생성할 S3에 대한 권한과 sts 권한을 갖고 있어야 합니다.
$ aws sts get-caller-identity
{
    "UserId": "AROAX3JVEZxxxxxxxx:i-0ae8021f62xxxxxx",
    "Account": "53966xxxxxxx",
    "Arn": "arn:aws:sts::539xxxxxxxx:assumed-role/gepp-demo01-ssm-assume-ec2-role/i-0ae8021fxxxxxxx"
}
Pulumi 사용
이제 명령어 pulumi new aws-typscript 를 사용하여 새 프로젝트를 생성합니다.
$ pulumi new aws-typescript
Manage your Pulumi stacks by logging in.
Run `pulumi login --help` for alternative login options.
Enter your access token from https://app.pulumi.com/account/tokens
    or hit  to log in using your browser                   :


  Welcome to Pulumi!

  Pulumi helps you create, deploy, and manage infrastructure on any cloud using
  your favorite language. You can get started today with Pulumi at:

      https://www.pulumi.com/docs/get-started/

  Tip: Resources you create with Pulumi are given unique names (a randomly
  generated suffix) by default. To learn more about auto-naming or customizing resource
  names see https://www.pulumi.com/docs/intro/concepts/resources/#autonaming.


This command will walk you through creating a new Pulumi project.

Enter a value or leave blank to accept the (default), and press .
Press ^C at any time to quit.

project name (project): aws-create-s3-with-ts
project description (A minimal AWS TypeScript Pulumi program): cnp demo for pulumi
Created project 'aws-create-s3-with-ts'

Please enter your desired stack name.
To create a stack in an organization, use the format / (e.g. `acmecorp/dev`).
stack name (dev): dev
Created stack 'dev'

The packagemangager to use for installing dependencies npm
aws:region: The AWS region to deploy into (us-east-1): ap-southeast-1
Saved config

Installing dependencies...
added 422 packages, and audited 423 packages in 4m

60 packages are looking for funding
  run `npm fund` for details

found 0 vulnerabilities
Finished installing dependencies

Your new project is ready to go!

To perform an initial deployment, run `pulumi up`

$ ls
Pulumi.dev.yaml  Pulumi.yaml  index.ts  node_modules  package-lock.json  package.json  tsconfig.json
Pulumi yaml 은 지정했던 값이 들어가 있습니다.
$ cat Pulumi.yaml
name: aws-create-s3-with-ts
runtime:
  name: nodejs
  options:
    packagemanager: npm
description: cnp demo for pulumi
config:
  pulumi:tags:
    value:
      pulumi:template: aws-typescript
$ cat Pulumi.dev.yaml
config:
  aws:region: ap-southeast-1
이제 index.ts 를 수정하여 버킷 이름을 지정합니다.
$ cat index.ts
import * as pulumi from "@pulumi/pulumi";
import * as aws from "@pulumi/aws";
import * as awsx from "@pulumi/awsx";

// Create an AWS resource (S3 Bucket)
const bucket = new aws.s3.Bucket("gepp-demo01-pulumi-test-bucket01");

// Export the name of the bucket
export const bucketName = bucket.id;
aws 에러를 피하기 위해 pulumi up을 하기전에 먼저 크레덴셜이 정상적으로 s3 리소스로 접근 가능한지 테스트 해봅니다.
aws s3 ls이제 스택 배포 및 버킷 생성을 하기 위해 pulumi up 명령어를 실행합니다.
$ pulumi up
Previewing update (dev)

View in Browser (Ctrl+O): https://app.pulumi.com/INSANECRAB/aws-create-s3-with-ts/dev/previews/b929de47-a0e9-4f72-88c4-7ddexxxxxxx

     Type                 Name                            Plan
 +   pulumi:pulumi:Stack  aws-create-s3-with-ts-dev       create
 +   └─ aws:s3:Bucket     gepp-demo01-pulumi-test-bucket01  create

Outputs:
    bucketName: output

Resources:
    + 2 to create

Do you want to perform this update? yes
Updating (dev)

View in Browser (Ctrl+O): https://app.pulumi.com/INSANECRAB/aws-create-s3-with-ts/dev/updates/1

     Type                 Name                            Status
 +   pulumi:pulumi:Stack  aws-create-s3-with-ts-dev       created (7s)
 +   └─ aws:s3:Bucket     gepp-demo01-pulumi-test-bucket01  created (1s)

Outputs:
    bucketName: "gepp-demo01-pulumi-test-bucket01-ffa34xx"

Resources:
    + 2 created

Duration: 9s

$ aws s3 ls | grep gepp-demo
2024-06-23 15:36:30 gepp-demo01-pulumi-test-bucket01-ffa34xx
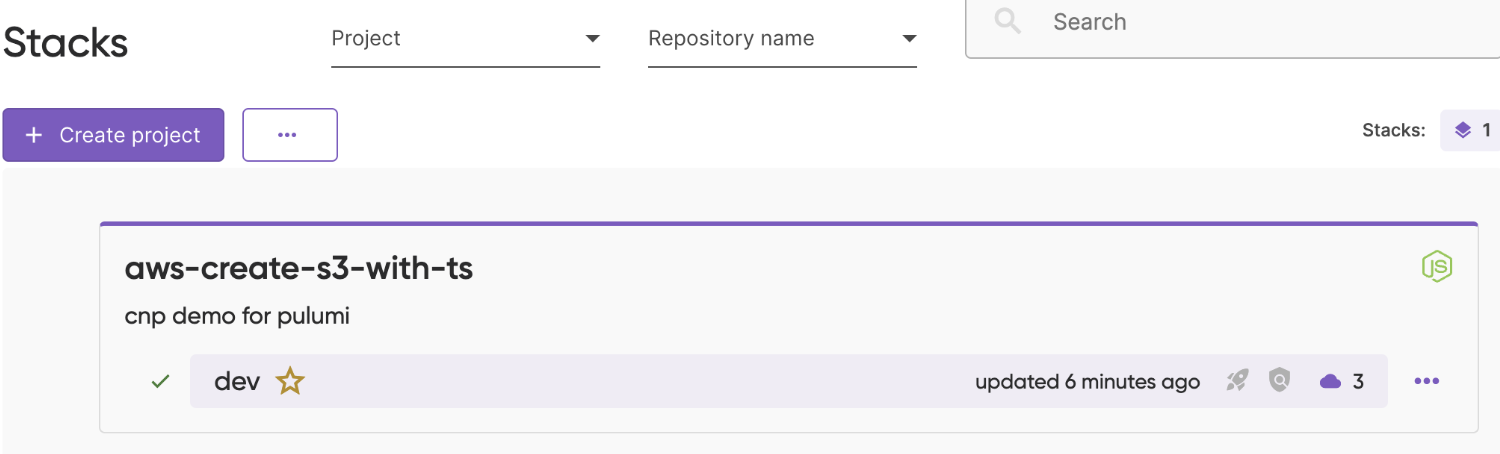
Pulumi Console 에서 방금 배포한 내용이 확인됩니다.
참고 문서
dynamic credentials with AWS OIDC 를 위해 pulumi yaml 에 아래와 같은 설정을 추가할 수도 있습니다.
'devops > ETC' 카테고리의 다른 글
| 교차 계정 AMP 설정하기 (EKS Prometheus pods to Amazon Managed Prometheus service in Cross Account) (0) | 2024.06.28 |
|---|---|
| Hashcorp Vault with a simple demo (0) | 2024.06.23 |
| Istio - service mesh (2) | 2024.06.15 |
| Aqua Security / Trivy (2) | 2024.06.15 |
| Cross Plane 이란 (0) | 2024.06.15 |