Aqua Security와 Trivy는 모두 컨테이너 이미지의 보안을 강화하기 위한 도구들입니다. Aqua Security는 엔터프라이즈급 보안 솔루션으로 컨테이너 및 서버리스 환경에서의 보안을 제공하며, Trivy는 오픈소스 취약점 스캐너로서 컨테이너 이미지의 취약점을 검사합니다.


Aqua Security 홈페이지 소개글:

Aqua Security는 애플리케이션 라이프사이클 전반에 걸쳐 클라우드 네이티브 공격을 차단하고 이를 보장하는 100만 달러의 클라우드 네이티브 보호 보증을 제공하는 유일한 회사입니다. 클라우드 네이티브 보안의 선구자인 Aqua는 고객이 비즈니스의 미래를 구축하는 동시에 위험을 줄일 수 있도록 지원합니다. Aqua Platform은 업계에서 가장 통합된 CNAPP(클라우드 네이티브 애플리케이션 보호 플랫폼)으로, 코드에서 클라우드까지 애플리케이션 라이프사이클을 보호합니다. 2015년에 설립된 Aqua는 매사추세츠주 보스턴과 일리노이주 라마트 간(Ramat Gan)에 본사를 두고 있으며 40개국 이상에서 Fortune 1000대 고객을 보유하고 있습니다.


Overview


Aqua Security는 컨테이너 기반 애플리케이션의 전반적인 보안을 담당하는 플랫폼입니다.

주요 기능으로는 이미지 보안 스캔, 런타임 보호, 네트워크 보안, 엑세스 제어, 보안 정책 관리 등이 있습니다.

Aqua는 DevOps 툴체인과 통합되어 CI/CD 파이프라인에서 보안 검사를 자동화하고,

컨테이너화된 애플리케이션의 보안 관리를 중앙 집중화합니다.


How to use


헬름 명령어로 쉽게 설치할 수 있습니다.


helm repo add aqua https://helm.aquasec.com
helm repo update
helm install aqua aqua/aqua \
  --namespace aqua \
  --set licenseToken=<your-license-token> \
  --set adminPassword=<admin-password> \
  --set database.storageClassName=<storage-class>


Aqua Security 설치 후, Aqua Console에 접속하여 이미지 스캔, 보안 정책 설정, 이벤트 모니터링 등을 수행할 수 있습니다.

Aqua Security는 Kubernetes에서 동작하며, 통합된 CLI 및 API를 제공하여 컨테이너 및 클러스터의 보안 상태를 관리할 수 있습니다.


Trivy


Trivy는 컨테이너 이미지의 취약점을 검사하는 오픈소스 도구입니다.

특히 빠르고 강력한 취약점 데이터베이스를 기반으로 하여,

컨테이너 이미지의 OS 패키지 취약점, 애플리케이션 취약점 등을 식별하고 보고할 수 있습니다.

Trivy는 개발자와 운영팀이 이미지를 빌드하고 배포하기 전에 보안 검사를 수행하는 데 유용합니다.


Trivy 사이트 소개글

Trivy는 가장 인기 있는 오픈 소스 보안 스캐너로, 안정적이고 빠르며 사용하기 쉽습니다.
Trivy를 사용하여 취약점 및 IaC 구성 오류, SBOM 검색, 클라우드 스캐닝, Kubernetes 보안 위험 등을 찾아보세요.


How to install and use


Trivy를 설치 시 binary 형태로 다운받거나 Docker로 설치할 수 있습니다.


도커 이미지로 Trivy 실행하기

docker pull aquasec/trivy
docker pull aquasec/trivy:0.18.3

docker run --rm -v /var/run/docker.sock:/var/run/docker.sock aquasec/trivy <image-name>
docker run --rm -v [YOUR_CACHE_DIR]:/root/.cache/ aquasec/trivy:0.18.3 [YOUR_IMAGE_NAME]

# MacOS

docker run --rm -v $HOME/Library/Caches:/root/.cache/ aquasec/trivy:0.18.3 python:3.4-alpine


Docker Hub: https://hub.docker.com/r/aquasec/trivy


https://hub.docker.com/r/aquasec/trivy


hub.docker.com


HomeBrew 로 설치하기

brew install aquasecurity/trivy/trivy


CentOS 기반 yum 명령어로 설치하기

$ sudo vim /etc/yum.repos.d/trivy.repo
[trivy]
name=Trivy repository
baseurl=https://aquasecurity.github.io/trivy-repo/rpm/releases/$releasever/$basearch/
gpgcheck=0
enabled=1
$ sudo yum -y update
$ sudo yum -y install trivy


Ubuntu 에서 설치하기

sudo apt-get install wget apt-transport-https gnupg lsb-release
wget -qO - https://aquasecurity.github.io/trivy-repo/deb/public.key | sudo apt-key add -
echo deb https://aquasecurity.github.io/trivy-repo/deb $(lsb_release -sc) main | sudo tee -a /etc/apt/sources.list.d/trivy.list
sudo apt-get update
sudo apt-get install trivy

# Or below

wget https://github.com/aquasecurity/trivy/releases/download/v0.18.3/trivy_0.18.3_Linux-64bit.deb
sudo dpkg -i trivy_0.18.3_Linux-64bit.deb


Binary로 다운로드하여 사용하기


wget https://github.com/aquasecurity/trivy/releases/download/v0.19.2/trivy_0.19.2_Linux-64bit.tar.gz
tar zxvf trivy_0.19.2_Linux-64bit.tar.gz
./trivy image <image-name>

# Or use the script depending on your env

curl -sfL https://raw.githubusercontent.com/aquasecurity/trivy/main/contrib/install.sh | sh -s -- -b /usr/local/bin v0.18.3


이미지 스캔하기

$ trivy image [YOUR_IMAGE_NAME]
$ trivy image python:3.4-alpine

$ docker save ruby:2.3.0-alpine3.9 -o ruby-2.3.0.tar
$ trivy image --input ruby-2.3.0.tar


Official document for installation: https://aquasecurity.github.io/trivy/v0.18.3/installation/

'devops > ETC' 카테고리의 다른 글

Hashcorp Vault with a simple demo  (0) 2024.06.23
Pulumi with a simple demo  (0) 2024.06.23
Istio - service mesh  (2) 2024.06.15
Cross Plane 이란  (0) 2024.06.15
Automation technologies including tech companies  (0) 2023.08.04


Overview


Crossplane 이란 “클라우드 네이티브 제어 영역 프레임워크” 이며,

코드를 작성할 필요 없이 어플리케이션과 인프라를 오케스트레이션 할 수 있는 프레임워크입니다.

쉽게 말해서 Kubernetes 클러스터에서 인프라 자원을 관리하기 위한 오픈 소스 툴입니다.


클라우드 업체에서 컨트롤 플레인을 사용해 플랫폼을 구축하듯이,

조직이 플랫폼을 구축할 수 있게 하는 kubernetes 기반 오픈 소스 CNCF 프로젝트입니다.


오케스트레이션을 위한 확장성있는 백엔드와 선언적인 API를 정의할 수 있는 프런트엔드를 갖추고 있습니다.

Kubernetes 기반으로 구축되어 RBAC 등 컨테이너 뿐 아니라 모든 것을 조율할 수 있으며 클라우드 기본 도구와 통합 가능 합니다.


Upbound 라는 마켓플레이스를 통해 Crossplane Provider 과 구성을 쉽게 찾을 수 있습니다.

또한 Apache 2.0 라이센스를 따라 출시된 오픈 소스이며 커뮤니티 중심 프레임워크 입니다.


How to use


Helm 이 설치되어있다면, 헬름을 통해 Crossplane을 설치할 수 있습니다.


helm repo add crossplane-stable https://charts.crossplane.io/stable
helm repo update
helm install crossplane --namespace crossplane-system crossplane-stable/crossplane


또는 Crossplan Github Repository 에서 직접 yaml 파일로 다운받아 설치할 수 있습니다.


kubectl apply -f https://raw.githubusercontent.com/crossplane/crossplane/main/deploy/release/crossplane/provider-latest.yaml


본인은 AWS에 익숙하므로, 사용을 위해 AWS Provider 기반으로 기술하겠습니다.


IAM credential 이 필요하므로, 해당 경우에는 IAM Role을 사용하는 기반으로 기술합니다.


먼저 사용할 IAM Role 의 Trust Relationship 을 정합니다.


{
  "Version": "2012-10-17",
  "Statement": [
    {
      "Effect": "Allow",
      "Principal": {
        "AWS": "arn:aws:iam::123456789012:root" // 또는 Crossplane을 실행하는 IAM User의 ARN
      },
      "Action": "sts:AssumeRole"
    },
    {
      "Effect": "Allow",
      "Principal": {
        "Federated": "arn:aws:iam::<AWS_ACCOUNT_ID>:oidc-provider/<OIDC_PROVIDER_URL>" // Kubernetes OIDC Provider의 ARN
      },
      "Action": "sts:AssumeRoleWithWebIdentity",
      "Condition": {
        "StringEquals": {
          "oidc.eks.amazonaws.com/id/<CLUSTER_OIDC_ISSUER>": "system:serviceaccount:<KUBE_NAMESPACE>:<SERVICE_ACCOUNT_NAME>"
        }
      }
    }
  ]
}


AWS IAM Authenticator 를 설치합니다.


kubectl apply -f https://raw.githubusercontent.com/kubernetes-sigs/aws-iam-authenticator/master/dist/aws-iam-authenticator.yaml


Crossplane 이 사용할 Service Account 를 쿠버네티스에 생성하고 역할 바인딩을 합니다.


apiVersion: v1
kind: ServiceAccount
metadata:
  name: crossplane-serviceaccount
  namespace: crossplane-system

---

apiVersion: rbac.authorization.k8s.io/v1
kind: RoleBinding
metadata:
  name: crossplane-rolebinding
  namespace: crossplane-system
subjects:
- kind: ServiceAccount
  name: crossplane-serviceaccount
  namespace: crossplane-system
roleRef:
  kind: ClusterRole
  name: system:node-proxier // 또는 사용 권한이 필요한 ClusterRole
  apiGroup: rbac.authorization.k8s.io


이제 Crossplane 이 IAM 역할을 사용할 수 있도록 AWS ProviderConfig 를 설정합니다.


apiVersion: aws.crossplane.io/v1alpha3
kind: ProviderConfig
metadata:
  name: aws-providerconfig
spec:
  credentials:
    source: ProviderSecret
    providerSecretRef:
      namespace: crossplane-system
      name: aws-provider-secret


사용 예)

Crossplane을 사용하여 AWS RDS 인스턴스를 생성할 때, Crossplane은 해당 IAM Role을 통해 AWS 자원에 접근하게 됩니다. 


apiVersion: database.aws.crossplane.io/v1alpha1
kind: RDSInstance
metadata:
  name: example-db
spec:
  engine: mysql
  engineVersion: "5.7"
  instanceClass: db.t2.micro
  storageGB: 20
  multiAZ: false
  ... (기타 필요한 설정)


사용 명령어 예시


# get crossplane resources
kubectl get <crossplane-resource-type>
kubectl get rdsinstances.aws.crossplane.io
kubectl get rdsinstances.aws.crossplane.io -l app=example-app
kubectl get rdsinstances.aws.crossplane.io --field-selector=status.phase=Failed

# describe
kubectl describe <crossplane-resource-type> <resource-name>
kubectl describe rdsinstances.aws.crossplane.io example-db

# create resources
kubectl apply -f <yaml-file>

# delete resources
kubectl delete <crossplane-resource-type> <resource-name>
kubectl delete rdsinstances.aws.crossplane.io example-db


Official document to start Crossplane: https://docs.crossplane.io/latest/software/install/

'devops > ETC' 카테고리의 다른 글

Hashcorp Vault with a simple demo  (0) 2024.06.23
Pulumi with a simple demo  (0) 2024.06.23
Istio - service mesh  (2) 2024.06.15
Aqua Security / Trivy  (2) 2024.06.15
Automation technologies including tech companies  (0) 2023.08.04


eks tcp application pod에 대한 tcp 연결 테스트용 스크립트 작성


tcp_conn.py

import socket

def tcp_health_check(host, port):
    message = "!!!HEALTH_CHECK!!!"
    expected_responses = ["ok", "OK", "Ok"]
    
    try:
        with socket.socket(socket.AF_INET, socket.SOCK_STREAM) as sock:
            sock.connect((host, port))
            print(f"Connected to {host} on port {port}")
            sock.sendall(message.encode())
            print(f"Sent: {message}")
            response = sock.recv(1024).decode()
            print(f"Received: {response}")
            if response in expected_response:
                print("Health check passed: received expected response.")
            else:
                print("Health check failed: unexpected response.")
    
    except socket.error as e:
        print(f"Socket error: {e}")

# Target port and IP or hostname
eks_pod_ip = "<pod ip or hostname>"
port = <target port>

# execute health check
tcp_health_check(eks_pod_ip, port)


EFS 를 동적 프로비저닝 및 iam option 을 통한 IRSA 로 EFS 접근 시 구성

PVC 에 iam 마운트 옵션을 정의하고 동적 프로비저닝에 의해 자동 생성된 PV는 이를 상속받습니다.

해당 구성은 EKS Fargate 가 아닌 EKS EC2 Node 사용 시 동적 프로비저닝 예시입니다.


Sample of storageclass.yaml

allowVolumeExpansion: true
apiVersion: storage.k8s.io/v1
kind: StorageClass
metadata:
  annotations:
    storageclass.kubernetes.io/is-default-class: "true" # true or false
  name: default-efs
mountOptions:
  - iam
  - tls
parameters:
  directoryPerms: "755" # directory permission value of 755 allows the directory user owner to list files, create files, and mount, and all other users to list files and mount.
  fileSystemId: fs-xxxxxxxx # replace this with the efs id actually created on your env
  provisioningMode: efs-ap
  gidRangeStart: "1000"
  gidRangeEnd: "2000"
  basePath: "/data" # whatever you want
  encrypted: "true" # in case you use encryption on your EFS
provisioner: efs.csi.aws.com
reclaimPolicy: Delete
volumeBindingMode: Immediate


tls option 은 deprecated 되었다고 로그가 확인되어, tls 는 뺐고 (default 가 tls enabled) EFS 가 암호화 되어있어 encrypted: true 를 넣었습니다.


Sample of pvc.yaml


apiVersion: v1
kind: PersistentVolumeClaim
metadata:
  name: efs-pvc-test
spec:
  accessModes:
    - ReadWriteMany
  storageClassName: default-efs
  resources:
    requests:
      storage: 1Gi # adjust this depending on your requirement


Sample of serviceaccount.yaml


apiVersion: v1
kind: ServiceAccount
metadata:
  annotations:
    eks.amazonaws.com/role-arn: arn:aws:iam::<account number>:role/<iam role name>
  name: test
  namespace: <your namespace>


테스트 시에는 IAM 역할 없이 마운트 잘 되었고 eks node(ec2) 역할에 권한이 있었다.


Sample of efs-test-pod.yaml


apiVersion: v1
kind: Pod
metadata:
  name: efs-testpod-01
spec:
  serviceAccountName: test
  containers:
    - name: alpine
      image: alpine
      command: ["/bin/sh"]
      args: ["-c", "echo 'Starting Nginx'; echo 'Log entry: $(date)' >> /usr/share/nginx/html/log.txt; sleep infinity"]
      volumeMounts:
        - name: efs-volume
          mountPath: /usr/share/nginx/html
  volumes:
    - name: efs-volume
      persistentVolumeClaim:
        claimName: efs-pvc-test


Pod 아웃바운드 보안그룹에 NFS 포트(port 2049) 허용, EFS 보안그룹에 pod 보안그룹 인입에 대한 NFS 포트 허용이 되어있어야 하고,

IRSA 용 IAM 역할의 권한에 해당 서비스(EFS)에 접근할 권한이 포함되어 있어야 합니다.


velero 가 설치되지 않은 클러스터에서 배포된 자원 manifest 정보를 txt 파일에 저장하는 bash shell script 코드. 

kubectl ... -o yaml 과 함께 아래 neat 를 설치 및 조합하면 기타 타임스탬프 등 불필요한 정보를 제외한 readable 버전으로 저장이 가능합니다.

해당 조합으로 저장 시 txt 대신 yaml 로 저장하고 배포가능한 형식으로 테스트할 수 있습니다.

kubectl krew install neat # neat 설치 명령어.


그 전에 krew 가 설치되어있지 않다면 다음을 이용해 미리 설치해 둡니다.


# run a script by copy and paste to your command line
(
  set -x; cd "$(mktemp -d)" &&
  OS="$(uname | tr '[:upper:]' '[:lower:]')" &&
  ARCH="$(uname -m | sed -e 's/x86_64/amd64/' -e
 's/\(arm\)\(64\)\?.*/\1\2/' -e 's/aarch64$/arm64/')" &&
  curl -fsSLO "https://github.com/kubernetes-sigs/krew/releases/latest/download/krew.tar.gz" &&
  tar zxvf krew.tar.gz &&
  KREW=./krew-"${OS}_${ARCH}" &&
  "$KREW" install krew
)

# set the path env of krew
export PATH="${KREW_ROOT:-$HOME/.krew}/bin:$PATH"


< Code Sample >

#!/bin/bash

# 백업할 네임스페이스 지정
NAMESPACES=("apples" "bananas" "grapes" "strawberries" "melons")

# 각 네임스페이스의 리소스 정보를 txt 파일로 저장
for namespace in "${NAMESPACES[@]}"
do
    echo "네임스페이스 $namespace 리소스 정보 저장 중..."
    
    # 네임스페이스의 모든 리소스 정보 가져오기
    kubectl get all -n "$namespace" -o yaml > "$namespace-resources.txt"
done

# gp2, gp3, default-efs StorageClass 정보 저장
echo "StorageClass 정보 저장 중..."
kubectl get storageclass gp2 -o yaml > gp2-storageclass.txt
kubectl get storageclass gp3 -o yaml > gp3-storageclass.txt
kubectl get storageclass default-efs -o yaml > default-efs-storageclass.txt

echo "모든 정보가 txt 파일로 저장되었습니다."


python3이상, boto3 설치 필요

import boto3
import time

aws_profile = "your aws profile"
aws_region = "your region"

session = boto3.Session(
    profile_name=aws_profile,
    region_name=aws_region
)

eks_client = session.client('eks')

cluster_name = 'your cluster name'

# 해당 클러스터의 모든 Fargate 프로필 이름 가져오기
response = eks_client.list_fargate_profiles(clusterName=cluster_name)
profiles = response['fargateProfileNames']

# 각 Fargate 프로필 삭제
for profile in profiles:
    print(f"Deleting Fargate profile: {profile}")
    eks_client.delete_fargate_profile(clusterName=cluster_name, fargateProfileName=profile)
    
    # 삭제 상태 확인
    while True:
        try:
            eks_client.describe_fargate_profile(clusterName=cluster_name, fargateProfileName=profile)
            print(f"Waiting for {profile} to be deleted...")
            time.sleep(10)  
        except eks_client.exceptions.ResourceNotFoundException:
            print(f"{profile} deleted.")
            break

print("All Fargate profiles have been deleted.")


argocd를 helm 을 이용해 설치하고 다음 값을 설정해서 설치하였다.


USER-SUPPLIED VALUES:
rbacConfig:
  groups:
  - name: admin
    rules:
    - apiGroups:
      - '*'
      resources:
      - '*'
      verbs:
      - '*'
  users:
  - groups:
    - admin
    name: admin
server:
  extraArgs:
  - --insecure
  ingress:
    annotations:
      kubernetes.io/ingress.class: nginx
      nginx.ingres.kubernetes.io/affinity: cookie
      nginx.ingress.kubernetes.io/session-cookie-expires: "172800"
      nginx.ingress.kubernetes.io/session-cookie-max-age: "172800"
      nginx.ingress.kubernetes.io/session-cookie-name: route
      cert-manager.io/cluster-issuer: letsencrypt-prod
      acme.cert-manager.io/http01-edit-in-place: "true"
      meta.helm.sh/release-name: argocd
      meta.helm.sh/release-namespace: argocd
      
    enabled: true
    hosts:
    - argocd.yourdomain.com
    ingressClassName: nginx
  service:
    type: NodePort
        # -- Ingress TLS configuration
    tls: []
        # - secretName: argocd-applicationset-tls
        #   hosts:
        #     - argocd-applicationset.example.com


인증서를 쓰는 도메인을 사용할 경우 tls에 기술한다.

helm 설치 후 해당 네임스페이스에 기술한 시크릿이 생성되었는지 확인한다.

tls 설정 부분을 위한 annotation이 부족한 경우 정상적으로 시크릿이 생성되지 않고 사이트에 불완전한 커넥션 표시가 뜰 수 있다.

위 동작을 위해 cert-manager가 쿠버네티스 클러스터에 미리 설치되어 있어야 한다.


또한 인그레스를 활성화하는 값을 사용했으므로 해당 네임스페이스에 정의한 ingress가 생성되었는지 확인한다.


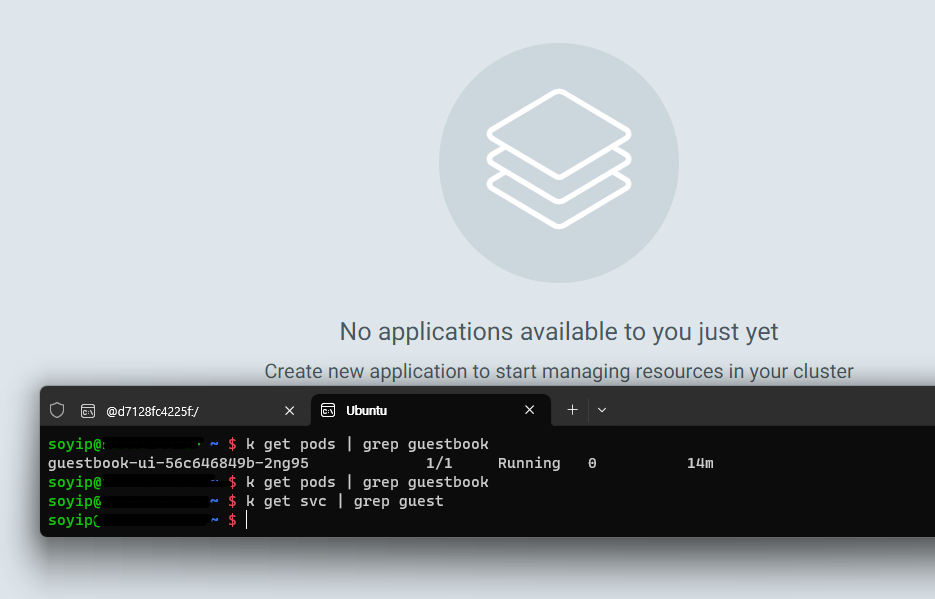
어플리케이션 배포에 앞서 test Project를 생성하고 테스트를 위해 권한이 있는 role을 부여했다.

Clusters엔 현재 argocd 를 올려놓은 Cluster 가 등록되어있는 상태다.


이후 Applications 에서 EDIT AS YAML을 선택하여 아래와 같이 기본적인 테스트를 위한 설정을 입력했다.


project: test
source:
  repoURL: 'https://github.com/argoproj/argocd-example-apps'
  path: guestbook
  targetRevision: HEAD
destination:
  server: 'https://kubernetes.default.svc'
  namespace: default


어플리케이션이 처음 등록에 성공하면 Out of sync 상태로 표시되어있고,

해당 어플리케이션을 sync 해주면 세부사항이 바뀌면서 실제로 해당 네임스페이스에 리소스가 배포된 것을 확인할 수 있다.


등록했던 어플리케이션을 Delete 선택하여 삭제하면 다음과 같이 배포되었던 리소스도 삭제되었다.


현재 작업 중인 로컬 브랜치의 변경사항을 모두 지우고, git에서 받아온 main 브랜치만 최신으로 유지


git reset 시 현재 브랜치에서의 변경사항을 모두 취소하고 이전 커밋 상태로 되돌아간다.

이후 checkout 하여 branch를 main으로 바꾸고, 최신 버전으로 업데이트 하기 위해 pull 한다.

git reset --hard HEAD
git checkout main
git pull origin main


※ 현재 detached된 HEAD 브랜치를 기반으로 새로운 브랜치를 만들고

그 브랜치에서 main 브랜치를 merge 하기


# 새 브런치 만들기
git checkout -b mybranch-new
# 수정된 파일을 추가하고 커밋 (merge 시 충돌 발생한 경우 해결 후 이부분 반복)
git add <filename1> <filename2> <filename3>
git commit -m "Feature: Changes according to the request"
# main branch로 이동후 main 브랜치를 최신으로 업데이트
git checkout main
git pull origin main
# 새로 만든 mybranch-new 브랜치를 main 브랜치로 merge 병합 (main에 있는 상태에서 상대 branch를 merge)
git merge mybranch-new
# main branch에 변경사항 업데이트
git push origin main

+ Recent posts